بسم الله الرحمن الرحيــم
Types of Drip Irrigation EmittersEmitters are classified into groups based on how their design type and the method they use to regulate pressure. You can create a very simple emitter by drilling a very small hole in a pipe. However, a hole alone does not work well. Unless the hole is extremely small, the water tends to forcefully shoot out of it like a tiny fire nozzle and way too much water will come out. More importantly, there is little uniformity of flow when using a simple hole. If you have a long pipe with holes drilled in it the holes on the end nearest the water source will have a large water flow from them, while those at the far end will have a very small flow.
Since using a simple hole in a pipe does not work very well, the early pioneers of drip irrigation started playing around with mechanical devices that would better regulate the flow. These devices have been given the name "emitters" (or sometimes "drippers" is used.) The emitters are installed on the pipe and act as small throttles, assuring that a uniform rate of flow is emitted. Some are built into the pipe or tubing, others attach to it using a barb or threads. The emitter reduces and regulates the amount of water discharged.
Long-Path EmittersThere are many different methods used by emitters to create and maintain this uniform, low, flow rate. Some emitters route the water through a very long, narrow passage or tube. The small diameter and great length of this path reduces the water pressure and creates a more uniform flow. These are called long-path emitters. A typical long-path emitter has a long water path that circles around and around a barrel shaped core. Long path emitters tend to be fairly large in size due to the need to fit that long tube in!
Soaker hose, porous pipe, drip tape, laser tubingSoaker hose, porous pipe, drip tape, and laser tubing are various adaptations of the "extremely small hole in a pipe" type of drip system. They just have very small holes drilled (usually using a laser) into a tube, or are made from materials that create porous tubing walls that the water can slowly leak out of. The advantage of these is obviously very low cost. The disadvantage is that the tiny holes are very easily clogged, especially with hard water containing lots of minerals, and for some products watering uniformity can be uneven. These types of systems are most often used in landscapes for portable irrigation (moving the tubes around the yard between irrigations tends to break the mineral deposits loose so they don't build up. These products are also widely used in agriculture, where the tubes are removed and thrown away or recycled at the end of each growing season. My experience with permanent installations of these products has been that they have a fairly limited lifespan when compared to other drip irrigation types. They work best with water that has very low mineral levels.
Short-Path EmittersShort-path emitters are similar to the long path emitters. They just have a shorter and smaller water path. Advantages: they are very cheap and will work on very low-pressure systems where other types will not work at all. They are the best emitters for very low pressure systems, such as gravity flow drip systems fed by water from rain barrels. Disadvantages: They clog up easily, especially if the water is hard with lots of minerals in it. They have poor water distribution uniformity compared to other types of emitter. They work good on small systems, where cost is a critical issue and uniformity of water distribution is not critical. By far the most common of these short-path emitters is a very inexpensive generic emitter called a "flag emitter" or a "take-apart emitter". This emitter is made under numerous brands and names. It is easily recognized by the little flag shaped handle on it, you can disassemble it by twisting and pulling on the flag. The photo below shows two flag emitters, the one on the right is disassembled. You can see spirals that form the short, narrow water path on the male part of the disassembled emitter.
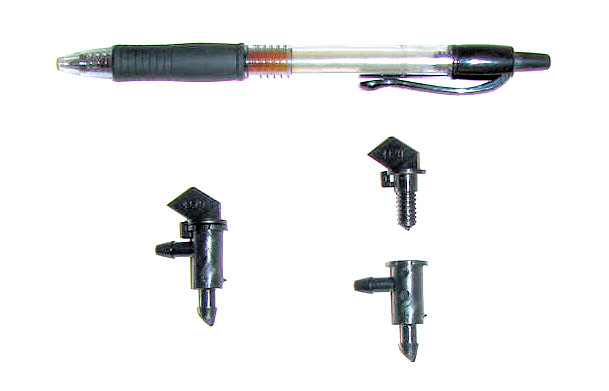
Typical Flag/Take-Apart Emitters, the one on the right is disassembled.
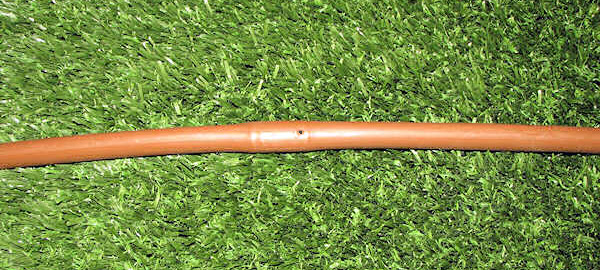
This is a short path emitter, but this brand was sold in a package incorrectly labeled as a "turbulent flow".
The pen is to show the size of the emitters.
Tortuous-Path or Turbulent-Flow EmittersThe next type of emitters are called tortuous-path and/or turbulent-flow emitters. These emitters work by running the water through a path similar to the long path type, but the path has all kinds of sharp turns and obstacles in it. These turns and obstacles result in turbulence in the water, which reduces the flow and pressure. By using the tortuous path the emitter water passages can have a shorter length and larger diameter. These larger passages make the emitter less likely to clog up. I like tortuous-path and turbulent-flow emitters because they are simple, cheap, and work good.
Typical turbulent-flow or tortuous-path emitters.
The one on the right is cut open so you can see the jagged turbulent flow path.
Vortex EmittersVortex emitters run the water through a vortex (whirlpool) to reduce the flow and pressure. If you reflect back on the high school lessons you slogged through, you will remember that the faster your car goes, the more likely you are to have a girlfriend. Wait, that's the wrong high school lesson! The lesson we want is the lesson about the whirlpool around the bathtub drain. (A great visual image of the social life of that high school male with the slow car!) In the bathtub drain lesson we learned that the pressure drops at the center of a vortex. The vortex emitter uses that same principle by swirling the water around the outlet hole to cause a drop in pressure and a lower flow through the hole. Most vortex emitters also have very small inlet and outlet holes. I honestly think the small holes have more to do with reducing the flow than the vortex, but that's just my opinion. Advantages-- vortex emitters are small in size (about the size of a large pea) and very inexpensive! Disadvantage- because of those small holes they clog up easily, especially if you have hard water (ie; lots of minerals in the water.)
Yes, since some of you are wondering, I had a slow car in high school. My mother named it Leaping Lena because it backfired a lot. Wow, I really wish I still had my old 1950 Plymouth DeLuxe!

Vortex Emitter.
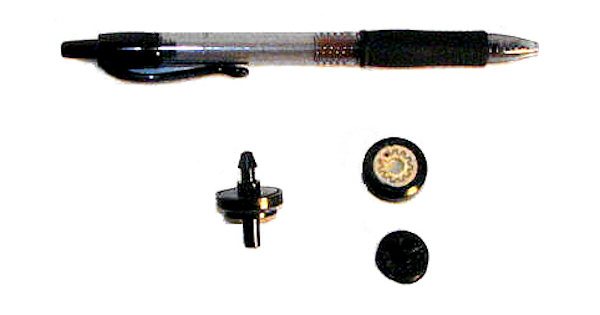
Diaphragm EmittersDiaphragm emitters all use some type of flexible diaphragm to reduce the flow and pressure. They use many different ways to do this, some have diaphragms with holes that stretch, others move the diaphragms back and forth to reduce the size of the adjacent water passages. The bottom line is they all use some type of flexible part that moves or stretches to restrict or increase the water flow. As with anything that moves, they will wear out eventually (which may be a very long time!) which is the downside. The advantage is that they tend to be much more accurate in controlling the flow and pressure than the previous types.
Diaphragm Emitters
The emitter on the right has been cut in half to show the round rubber diaphragm disk found inside.
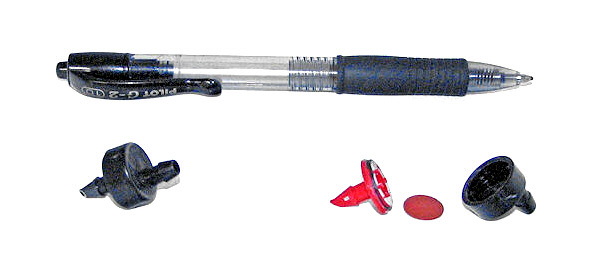
Adjustable Flow EmittersAdjustable flow emitters have an adjustable flow rate. Typically the emitter has a dial that you turn to change the flow rate. The design of most of these is very similar to the short path type of emitter. Adjustable flow emitters tend to vary greatly in flow and have little pressure compensation. I recommend adjustable flow emitters only for use in pots and hanging baskets. Because the water needs of each pot or basket tend to vary greatly, the ability to adjust the emitter flow is very useful in these situations. Adjustable flow emitters often allow much higher flows which can be useful if you only need a few emitters on a valve circuit.

Adjustable Flow Emitters.
Turning the knobbed body changes the flow, similar to the handle on a valve.
Mechanical EmitterThere is one last type of emitter that I am aware of, which is the mechanical emitter. The mechanical emitter uses a chamber which fills with water then dumps it out at preset intervals of time. Much like filling a cup with water and then pouring it out. I haven't seen a mechanical emitter in years. The last one I saw was a prototype at Cal Poly, Pomona University back when I was a student there in the mid 1970's. While extremely accurate in flow, they were too complicated and costly to produce.
Dripline, DripperlineDripline, dripperline and other variations on that name are used to describe a drip tube with factory preinstalled emitters on it. Often the emitters are actually molded inside the tubing and all that is visible on the outside is a hole for the water to come out. The emitters are typically the tortuous-path or diaphragm type, but may be other types as well. The emitters are uniformly spaced along the tube, often several different spacing options are available. The primary advantage of dripline is ease of installation due to the preinstalled emitters. It is often used in agriculture, it also works well in situations where you want to create a solid band of watered soil, such as watering groundcover beds, vegetable gardens, and lawn.
Dripline with factory installed emitter.
Notice the water exit hole and outline of emitter inside the tube.
google_protectAndRun("render_ads.js::google_render_ad", google_handleError, google_render_ad);
Pressure Compensating vs. Non-pressure Compensating EmittersThere are two basic categories of drip emitters, pressure compensating and non-pressure compensating. These names are a little misleading, as all emitters are pressure compensating to some degree, that is essentially the purpose of an emitter! What this means is you can't determine what is pressure compensating by the manufacturer's literature, almost all of them can make that claim. Water pressure is measured in bars (yes kids, that's metric) and most are designed to work best at 1,5 to 2,0 bars of pressure. For those of you in the good ol' United States of America, that's around 20 PSI (pounds per square inch, the water pressure measurement unit used in the USA.)
I'm going to define pressure compensating emitters as those that are designed to discharge water at a very uniform rate under a very wide range of water pressures. For the purposes of these guidelines I am going to say true pressure compensating emitters give essentially the same flow at 3,0 bars (45 PSI) as they do at 1,0 bars (15 PSI). As far as I know, all of the emitters currently being sold that fit this requirement are diaphragm-type emitters. But there may be exceptions, there are literally hundreds of different emitter designs on the market!
How do you know which emitters are pressure compensating and which aren't?Well, you can't rely on label names or product names. As previously mentioned, all emitters can qualify to some degree as pressure compensating and it is common for emitters that don't meet my requirements to be labeled on the package as "pressure compensating". The best way to tell is to find the performance data for the emitter you are looking at. Is the flow rate pretty much the same at 1,0 bars (15 PSI) as it is at 3,0 bars (45 PSI)? If so, then it meets my requirements. Another way to tell is by the type of emitter. If it does NOT have a rubber diaphragm in it, then it probably does not meet my requirements to be considered pressure compensating. In many cases the only way to find this out is to buy one and carefully cut it open. I suggest putting the emitter in a vise and using a hacksaw to cut it in half. They are small, hard to hold, and made of hard plastic that is difficult to cut with a knife.
Should you use a pressure compensating emitter?Surprise! You probably do NOT need pressure compensating emitters! Pressure compensating emitters that meet my requirements are typically more expensive than non-compensating emitters. So why spend the money on them if it is not necessary? For most residential applications the non-pressure compensating turbulent-flow type emitters are a good choice. You should use pressure compensating emitters if you have an elevation difference of over 1,5 meters (5 feet) in the area you are irrigating. So if you have a small hill in your backyard and you are going to install a drip system on it you should use pressure compensating emitters. Also you should use pressure compensating emitters if you plan on stretching the limits of your design, such as using a longer drip tube than is recommended in the drip guidelines on this website. While I don't recommend stretching the design limits, a pressure compensating emitter will be more forgiving of such things. Unsure? Most of the time it will not hurt anything (other than your pocketbook) to use pressure compensating emitters. The exception is that most pressure compensating emitters should NOT be used with very low water pressure systems, such as gravity flow systems, as they often do not work at all with very low water pressure. See the Gravity Flow Drip Systems page for more suggestions for low water pressure systems.
Flow rates.Emitters come in a variety of different flow rates. The most common flow rates are:
- 2,0 liters/hour - 1/2 gallon per hour
- 4,0 liters/hour - 1 gallon per hour
- 8,0 liters/hour - 2 gallons per hour
I prefer a lower flow rate for most situations and I primarily use 2,0 l/hr (1/2 gph) emitters on my drip systems. Using this lower flow means I can install almost twice as many emitters on the same pipe and valve circuit! Plus, I save even more water because the lower flow emitters are more efficient! Most soils can't absorb the higher flow rates, so the extra water tends to puddle around the emitter where it evaporates, or it may even run off into the gutter. With drip irrigation you want the water to be immediately absorbed into the soil as it comes out of the emitter. If you can find them I recommend 2,0 l/hr (0.5 gph) emitters. These are often called "1/2 gallon per hour emitters" in the USA. If you can't find them, then use the 4,0 l/hr (1 gph) emitters.
If the soil is sandy I suggest you use emitters with a flow rate of 4,0 liters/hour (1 gph) or higher. In sandy soils the water tends to just go straight down in the soil, using a higher flow rate will force it to move sideways farther.
There are situations where a higher flow emitter is a better source. Are you planning to use automatic electric solenoid valves? If you have a very small drip system that will require only a few emitters you may want to use higher flow emitters. This is because the standard electric sprinkler valves often do not work at very low flows. Some valves will work at lower flows than others, so compare brands. Here are some general guidelines for keeping the flow within a range that most automatic (electric solenoid type) irrigation valves can handle:
- 0-50 emitters - find a low flow valve
- 50-100 emitters = 8,0 l/hr (2 gph)
- 100-200 emitters = 4,0 l/hr (1 gph)
- 200+ emitters = 2,0 l/hr (1/2 gph)
Remember, one trick for increasing the number of emitters on your system is to use more than 1 emitter per plant. Manual operated valves will work at any flow so you can use as little as 1 emitter with them. Mechanical motor-driven valves will also work for extremely low flows. However they are expensive and hard to find.
Mixing emitter flow ratesMixing different emitter flow rates together on the same system is not a good idea. Pick a single flow rate and stick to it. Plants that need more water should have more emitters per plant, do not use emitters with higher flow rates on them. An exception is with potted plants, where different size pots and types of soil in the pots make using adjustable flow emitters the best choice.
Installing Emitters:To install the emitters you create a hole in the drip tubing using a punch. Then you press the barbed emitter inlet into the hole and the barb locks it in place. Because the poly drip tube is elastic, it stretches around the barb and then seals itself around the stem of the barb. The key is that you don't want the hole you punch in the tubing to be bigger than the diameter of the barb stem. When the hole is larger than the barb stem, the hole won't seal and you will have a leak. If the emitter manufacturer makes a special punch I suggest you use it as it will create the proper size hole in the tube. If a special hole punch is not available, in most cases an ice pick or even a nail will make a sufficient hole. Just make sure the diameter of the punch is not bigger than the stem on the emitter barb. Be careful to punch the hole through one side of the tube only, it is easy to go all the way through one side of the tube and out the other.
I suggest you buy some goof plugs before you start. Goof plugs are small plastic barbed plugs used to fill the holes that get punched in the wrong place. If you install an emitter in a place you don't want it, simply pull it back out and install a goof plug in the hole. If you try to put the emitter back in the same hole it will probably leak. Once you have a goof plug installed in the tube don't pull it out! If you want to reinstall the emitter make a new hole in the tube. The goof plug has a larger barb and stem than most emitters, which is how it fills the old stretched-out holes without leaking. When you pull out a goof plug the barb is so large that often it rips the tubing and ruins it. The only cure then is to cut out a section of tubing and splice in a new piece of tube using two tubing couplings.
Some emitters are made to be self-piercing of the tube and do not require the use of a punch. Generally this feature requires a special tool to be practical and is very difficult to do with just your hands. These installation tools are often pretty fancy and work similar to staple guns to install multiple emitters loaded into a cartridge. The tools are usually only sold at specialty irrigation stores. You can punch a hole for the self-piercing barbs with a standard hand-punch if you don't have the special tool and are having trouble pushing the self-piercing barbs into the tubing.
Brand & Model Selection:There are a lot of different brands and models of emitters! If you are unsure of a model, the best thing to do is to buy a sample or two, a short length of hose, and a hose bib adapter and test them by hooking them up to a faucet. To be real honest, for residential use most emitters I have tested seem to work pretty good. You can make some pretty good decisions about which is best for you by simply looking at them closely and considering your specific needs. Consider the following points.
Do you have hard water? Mineral deposits from hard water can plug emitters with small openings, such as vortex type and short path type (that's why both those types are often made so they can be disassembled for cleaning.) Look for bigger passages if you have hard water. Remember that the opening you can see when you look at an emitter is almost always large, manufacturer's tend to hide the smaller diameter ones inside the body where you can't see it!
Take a close look at the emitter's water inlet hole located on the barb. What shape is it? A round hole is easily clogged by a grain of sand in the water. An oblong (-) or cross (+) shaped hole is much more resistant to clogging. Some emitters even have multiple inlet holes of different and odd shapes. Multiple holes and odd shaped holes make it much less likely the inlet will become clogged by a grain of sand or other trash in the water! These are signs of a good quality emitter. The shape of the water exit hole is not nearly as critical to quality.
Consider ease of installation. If you are going to use the type of emitters you install on the tubing yourself take a look at the shape of the emitter. Put your thumb on it and press hard, as if you are pressing the barb into a hole in the tubing. Does it hurt your thumb? Your fingers can get really sore after inserting a few dozen emitters into the tubes. Some emitters have flat surfaces to press on, others don't. It can make a big difference in how uncomfortable it is to install the emitters. At the end of the day when your thumb is bright red and feels like it has been pounded on with a hammer, you may wish you had spend a little more money to buy an easier to install emitter! Regardless of the emitter you choose I suggest wearing a heavy glove on the hand you use to press the emitters into the tube.
Spitting Emitters:Some models and brands of emitters spit a small stream of water out of them each time the water is turned on. Vortex type and diaphragm type emitters most often tend to spit. Spitting doesn't particularly hurt the emitter performance, but it can be a problem if there are people around. some emitters can spit the water over a distance of two meters! (Translation to English units: "far enough to cause an embarrassing moment when you have that special guest sipping afternoon tea with you on the patio!") If spitting might cause a problem in your yard, I suggest getting a few test emitters and trying them out to see if they spit. The staff at an irrigation specialty store can probably tell you which brands spit. Don't expect the folks at the local hardware/home store to be able to tell you which models spit. I am aware of that some people have installed these intentionally in locations where they will spit of people! However, more often they just install a small tube without an emitter. The installation of spitting tubes as jokes in gardens are nothing new, they are found in ancient gardens in Europe.
Multi-Outlet Emitters.OK, let's get this out up front; I do not like multi-outlet emitters. There are a lot of people in the irrigation industry that disagree with me on this topic (as well as a lot who agree with me), so be aware that the following is just an opinion based on my experience. You can take it, or leave it, no hurt feelings on my part. The problem with multi-outlet emitters is that they require the use of small tubes to route the water from the emitter to the plants. These small tubes are typically called distribution tubes or spaghetti tubes. The tubes are about 6mm diameter (1/4 inch) and made of polyethylene or sometimes soft vinyl. This tubing is extremely high maintenance. It breaks, it gets cut by garden tools, it gets kicked around. It pulls loose from the emitter. Bugs crawl into it and get stuck. Pets and wildlife chew on it. It's trouble, plain and simple. Trouble, trouble, trouble! I suggest that you will be much happier if you avoid this small tube. I suggest you snake the larger 15mm (1/2") tubing between your plants and use single outlet emitters on it. The larger diameter tube holds up much better. One exception; the small tubing works good on trellises and for hanging pots where the tube can be firmly attached to a wood or wire supports for protection.